You are using an out of date browser. It may not display this or other websites correctly.
You should upgrade or use an alternative browser.
You should upgrade or use an alternative browser.
Converting a .RMVB file
- Thread starter SEÑOR
- Start date
pchelpworld
New Member
- Messages
- 124
- Reaction score
- 0
- Points
- 0
Convert RMVB with VirtualDub
There is a second more complicated way to convert your RMVB files. VirtualDubMod, which supports AVISynth scripts and MPEG-2 video importing, is an alternative method for converting RMVB files to a format suitable for DVD. To effectively convert the files, you need a specific set of tools and you need to perform all steps in the correct order.
Required Software:
VirtualDubMod
AVIsynth
Real Alternative
For this method of conversion, the official RealPlayer won't help, because it's missing a component only found in Real Alternative.
Download each of the applications. VirtualDubMod doesn't actually install anywhere. It is self contained. As of this writing the most current version is 1.5.10.2. Get the latest version of the software. After downloading and unzipping VirtualDubMod, download the latest version of AVIsynth 2.5 and install it in the default location. The final part of the install process is to download and install Real Alternative. If you have RealPlayer installed on your system, ignore the part about uninstalling it, you don't need to uninstall anything to get Real Alternative to work. Make sure the option next to RealMedia DirectShow Splitter is checked. You need this for the RMVB conversion process.
After you get all your applications installed, you need to create a couple of AVIsynth scripts. These are simple text files telling VirtualDubMod how to work with your RMVB format file. By creating these two script files, you have access to the scripts automatically anytime you want to covert a new RMVB file.
Notepad will work to create the scripts.
For the first file, copy these two lines of text into your text editor:
#ASYNTHER RMVB 23.976fps
DirectShowSource("%f", fps=23.976, convertfps=true)
Save your file as something meaningful like RMVB2376 with the file extension .avst in the VirtualDubMod template folder. This gives you access to the script from within the VirtualDubMod interface.
The first line is a comment that tells VirtualDubMod that you are calling AVIsynth to process your RMVB file with a script for RMVB files at approximately 24fps.
The second line tells AVIsynth the source is DirectShow to be played at 23.976 frames per second. %f tells AVIsynth to use the file you select in VirtualDubMod's Open dialog box. The convertfps=true tells AVIsynth to convert the video at whatever it's current frame rate is to 23.976fps. You want that last line in there because people encode video at wild framerates that don't match either the 24fps or 30fps standards.
Open another blank text file and paste in these two lines of code:
#ASYNTHER RMVB 29.97fps
DirectShowSource("%f", fps=29.97, convertfps=true)
Save this file with a different name like RMVB2997.avst in the VirtualDubMod template folder.
Again the first line is a comment so you know which script to select in the drop down menu. The second line tells AVIsynth to convert the video to 29.97fps.
With the scripts in the template folder, you are now ready to convert your RMVB file.
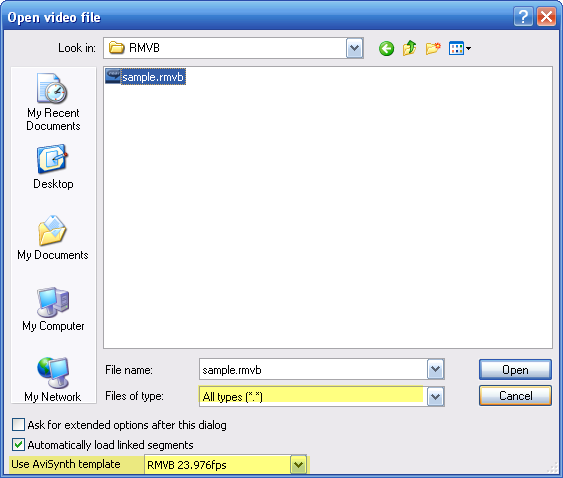
Open VirtualDubMod. From the file menu, choose Open Video File.
At the bottom of the open dialog box, choose the RMVB option most closely matching the actual frame rate of your RMVB file. If the RMVB file is 24fps, choose 23.97. If the RMVB file is 30fps, choose 29.97. Switch the Files of type dropdown to All files to locate your RMVB file. Select the RMVB file and click OK.

Assuming you followed all previous steps, your RMVB file will now be open in VirtualDubMod. If you need to edit the file, you can trim sections of it, or you can simple save the file to a different format.
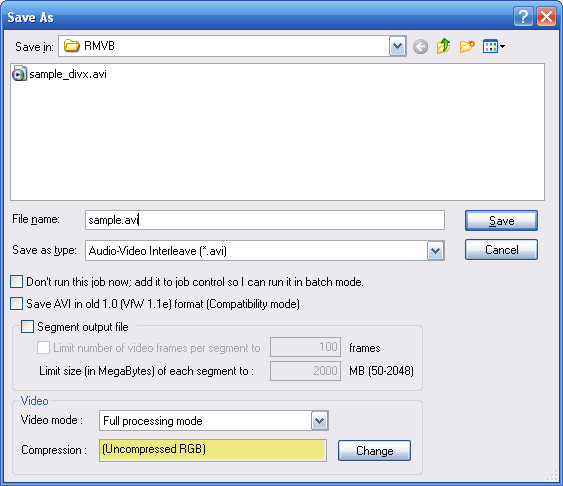
To save the file select Save As from the file menu. Depending on what you want to do with the file later, your choice of file formats may vary. If you simply want a file you can playback on any computer, many portable devices or potentially burn to DVD, converting the file with a DivX compatible codec may be an option because it keeps the file size small while still making the file more manageable than the rather obscure RMVB format. To go straight to DVD, I recommend saving out to AVI first with the default codec and then authoring the DVD, which means simply using the default settings.

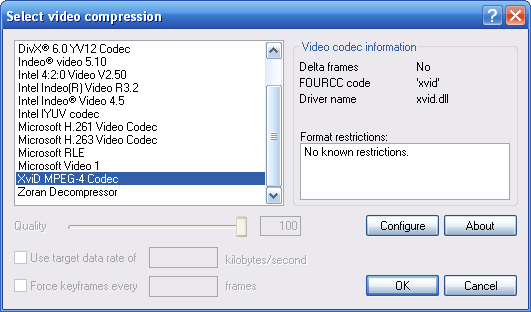
You can achieve much smaller file sizes using the XviD and DivX MPEG-4 container formats. The XviD codec is installed during the Real Alternative install. By clicking the Change button, you can select a different video compression option. Choose XviD and click OK.

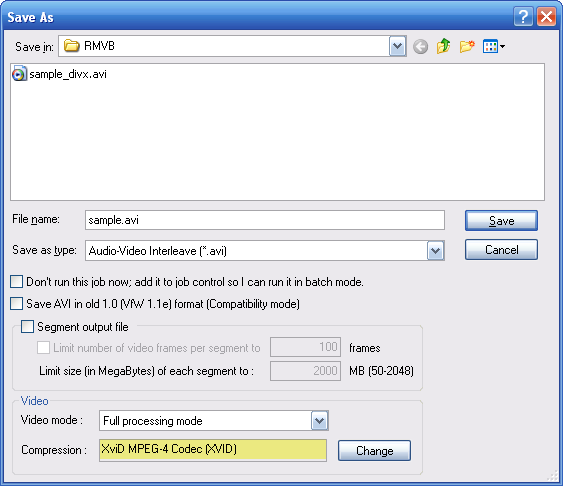
Now on the main Save As screen the Compression shows as XviD instead of (Uncompress RGB).

After choosing a format to save your video, click the Save button to start the transfer process. When you finish transferring the video, use the AVI file in any DVD authoring application to create a DVD.
There is a second more complicated way to convert your RMVB files. VirtualDubMod, which supports AVISynth scripts and MPEG-2 video importing, is an alternative method for converting RMVB files to a format suitable for DVD. To effectively convert the files, you need a specific set of tools and you need to perform all steps in the correct order.
Required Software:
VirtualDubMod
AVIsynth
Real Alternative
For this method of conversion, the official RealPlayer won't help, because it's missing a component only found in Real Alternative.
Download each of the applications. VirtualDubMod doesn't actually install anywhere. It is self contained. As of this writing the most current version is 1.5.10.2. Get the latest version of the software. After downloading and unzipping VirtualDubMod, download the latest version of AVIsynth 2.5 and install it in the default location. The final part of the install process is to download and install Real Alternative. If you have RealPlayer installed on your system, ignore the part about uninstalling it, you don't need to uninstall anything to get Real Alternative to work. Make sure the option next to RealMedia DirectShow Splitter is checked. You need this for the RMVB conversion process.
After you get all your applications installed, you need to create a couple of AVIsynth scripts. These are simple text files telling VirtualDubMod how to work with your RMVB format file. By creating these two script files, you have access to the scripts automatically anytime you want to covert a new RMVB file.
Notepad will work to create the scripts.
For the first file, copy these two lines of text into your text editor:
#ASYNTHER RMVB 23.976fps
DirectShowSource("%f", fps=23.976, convertfps=true)
Save your file as something meaningful like RMVB2376 with the file extension .avst in the VirtualDubMod template folder. This gives you access to the script from within the VirtualDubMod interface.
The first line is a comment that tells VirtualDubMod that you are calling AVIsynth to process your RMVB file with a script for RMVB files at approximately 24fps.
The second line tells AVIsynth the source is DirectShow to be played at 23.976 frames per second. %f tells AVIsynth to use the file you select in VirtualDubMod's Open dialog box. The convertfps=true tells AVIsynth to convert the video at whatever it's current frame rate is to 23.976fps. You want that last line in there because people encode video at wild framerates that don't match either the 24fps or 30fps standards.
Open another blank text file and paste in these two lines of code:
#ASYNTHER RMVB 29.97fps
DirectShowSource("%f", fps=29.97, convertfps=true)
Save this file with a different name like RMVB2997.avst in the VirtualDubMod template folder.
Again the first line is a comment so you know which script to select in the drop down menu. The second line tells AVIsynth to convert the video to 29.97fps.
With the scripts in the template folder, you are now ready to convert your RMVB file.
Open VirtualDubMod. From the file menu, choose Open Video File.
At the bottom of the open dialog box, choose the RMVB option most closely matching the actual frame rate of your RMVB file. If the RMVB file is 24fps, choose 23.97. If the RMVB file is 30fps, choose 29.97. Switch the Files of type dropdown to All files to locate your RMVB file. Select the RMVB file and click OK.

Assuming you followed all previous steps, your RMVB file will now be open in VirtualDubMod. If you need to edit the file, you can trim sections of it, or you can simple save the file to a different format.
To save the file select Save As from the file menu. Depending on what you want to do with the file later, your choice of file formats may vary. If you simply want a file you can playback on any computer, many portable devices or potentially burn to DVD, converting the file with a DivX compatible codec may be an option because it keeps the file size small while still making the file more manageable than the rather obscure RMVB format. To go straight to DVD, I recommend saving out to AVI first with the default codec and then authoring the DVD, which means simply using the default settings.

You can achieve much smaller file sizes using the XviD and DivX MPEG-4 container formats. The XviD codec is installed during the Real Alternative install. By clicking the Change button, you can select a different video compression option. Choose XviD and click OK.

Now on the main Save As screen the Compression shows as XviD instead of (Uncompress RGB).

After choosing a format to save your video, click the Save button to start the transfer process. When you finish transferring the video, use the AVI file in any DVD authoring application to create a DVD.
chaganlal1
New Member
- Messages
- 2,014
- Reaction score
- 0
- Points
- 0
Wow if you did write that you are smart lol. Also this should need to be a tutorial perhaps?
The_Magistrate
New Member
- Messages
- 1,118
- Reaction score
- 0
- Points
- 0
Here's a link to the tutorial.
http://www.jakeludington.com/dv_hacks/20051210_how_to_convert_rmvb.html
http://www.jakeludington.com/dv_hacks/20051210_how_to_convert_rmvb.html
pchelpworld
New Member
- Messages
- 124
- Reaction score
- 0
- Points
- 0
I could have but it would have taken much too long. I am currently trying to do my site.
Maddocks
Maddocks
SEÑOR
The Guy Everyone Hates
- Messages
- 4,638
- Reaction score
- 0
- Points
- 0
pchelpworld said:I could have but it would have taken much too long. I am currently trying to do my site.
Maddocks
I need a new program free or not that ones not working.
- x10Hosting Free Website Hosting
-
Free Web Hosting
-
Our Community
-
Legal

